Monday, January 17, 2011

My Fluffiest Tutu!

So my middle daughter's birthday is coming up. And in this house, that means a new tutu. So I took some time off from creating for others, and decided to create for her. Since it is a surprise, I had my wonderful 4 year old model for me

This is by far the fluffiest tutu I have ever created. And I'm very proud of it. Now I know the secret to those over priced (but very adorable) fluffy tutus. And I can do them myself for very little money. And then offer prices to knock out my competitors. Well, attempt to bring in more customers at least.

This tutu is sized to fit a 6T. It's a tad loose on Miss Josephine. But she manages it for me. Never mind the mess in the back. I figure the tutu isn't going out to a customer so I'm allowed to bring it out to the mess HAHA.

Sunday, January 16, 2011

10 Minute Leg Warmers

Leg warmers are very simple to make yourself. And very cheap. You can purchase your socks from anywhere. I've heard some people getting them from a dollar store. I bought mine from Kmart. Came in a pack of 2 for $5. So for that little amount of money I can get 2 sets of leg warmers. If you browse online, you'll be lucky to find just one pair that cheap.

So I've put together a little tutorial for you. Now go have some fun, no more excuses!

Materials

  • Women’s knee high socks
  • Scissors
  • Sewing Machine (or needle and thread if you don’t have a machine)

Start by picking out the socks you want and lay them flat. You’re going to cut right above the toes and the heel. Save the foot part.


You can save the toe and heel part if you want. Or just toss it. I save mine because it’s scrap fabric that can be used for another project later on.

Next, grab your foot of the sock and tuck it inside. Do this by pinching the middle and fold in. If this confuses you, simple turn it inside out, fold over in half (like you’re folding socks) line up raw edges and then turn right side out.

My pictures are blurry, sorry for that.

Next we’re going to tuck the leg of the sock INSIDE our new cuff. Line up all the raw edges.

Notice all the raw edges are TOGETHER

And now it’s time to sew. You can pin this together if you wish. I usually do because I’m not talented enough to keep it in place by myself.

Make sure you are sewing on the INSIDE. Otherwise you’ll sew it shut or have some funny looking seams showing.

Now inspect to make sure you have sewn all the edges together but still have an opening through the leg.

You can trim up the edges if you want. I do this sometimes, depending on how bad my sewing job was. Just be sure to not cut too close to your seam or it will come apart.

Now fold the cuff down and you’re finished!

Here’s my model. She’s only wearing one because that’s all I had done. She was in a good mood so I took advantage of it while I could.


Monday, January 10, 2011

Leg Warmers

So I've learned how to make leg warmers (as known as baby legs for babies). And boy are the simple. I don't know about the cheap part. Depends on what you would pay for them. Personally, I can't bring myself to spend more then $5 on things like this.

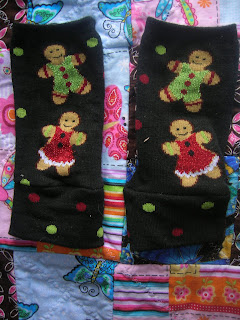
I made these miniature ones from some Christmas socks. I thought they were cute and had actually intended to wear them as socks. However, they did not fit my feet lol. There wasn't a whole lot of stretch to them. And my daughter didn't like them as socks. So I cut them up and make her some leg warmers. She just loved them!
Of course I couldn't stop at just one pair. So, I made some more. I got these socks from Kmart. They came with another pair that I am saving for a sock monkey. So, for $2.50 I got some extra cute leg warmers that I can wear if I want. Or my teenage daughter can use as arm warmers.

Without adding up the cost of things like need and thread, I got myself 2 sets of leg warmers for only $3.50!! I'm not sure what the cost would be if you had to buy the thread and needle. As I had already had those things laying around. And I used my sewing machine.

Later I will try to post up a tutorial on how to make your own baby legs/leg warmers/arm warmers. They seem to be all the rave for babies. And it's so much cheaper if you do it yourself.

Sunday, January 9, 2011

Possible Giveaway

I'm so excited to see my Facebook fan page, Fayth's Creations has reach over 100 members! In fact, it's slowly approaching 200! That's such a fast increase of fans, it has me tickled pink.

I'm thinking of hosting a giveaway once I reach 250 fans. But I'll need sponsors. Of course, I'll be including a few things of my own. But it's always way more exciting with the more things you have to offer.

If you, or someone you know, is interested in sponsoring a giveaway with me once 250 fans are reached please email me at faythscreations(at)yahoo(dot)com.

Teens Express Themselves

I don't know a single teenager out there today that isn't trying to be different from the crowd. Trying to put their own twist on things. They all want to be different, yet the same. And sometimes, as a parent, you have to step back and do a double take to ensure their modes of self expression are safe and healthy habits.

Here's just one of the many ways my teenage daughter loves to show her uniqueness. A girly suit shirt pair with pigtails and....a TUTU!

She received many compliments from her peers. And a few even asked where they could obtain one. So Mommas, watch out! Your teenager may be asking for one of their own soon. And why not? They fun and creative.

*Normally my tutus are not seen with the elastic showing. She chose to wear a tutu meant for a 6 year old CHILD. It shows the elastic is super stretchy, but the material was added to stretch this far. Had the tutu been worn by a child between the ages of 5 and 9 it would have retained it's full fluffy potential and no elastic would have been seen.

Saturday, January 8, 2011

Tutus at School?

tuSo it would appear, tutus are NOT just for pretend play. I mean, they are great for dancing around the house. But not every little girl wants to be limited to wearing her wonderful tutu at home.

Sometimes they want to let the world know of their self expression. And thus, the tutu wearing expands beyond the home and dress up parties. What a wonderful thing to let your little princess do! A tutu to school! A great way to show ALL her friends her creativity. And still feel like a princess.

Thursday, January 6, 2011

New 'Do


So I decided to create a new hair style. It's not an original of mine, but I had fun and it was something new for me. I learned to make this from Hairstyles For Girls-The Story Of A Princess And Her Hair. There are several different styles on her blog. My goal is to try as many as possible. this one was VERY simple. Even my 16 year old loved it.


You can also find them on Facebook where many of her fans post their own variations of the different styles.

Baby Doll Tutu


I created my first tutu meant for a baby doll. It didn't go so well. The waist was supposed to measure 11" at most. A general rule when cutting your elastic for the tutu--measure and minus 2. So, since the doll was 11", I cut to 9". All is well right?

Yeah that's what I thought. After I finished it, my results were a 12" wide tutu that is only 4.5" long. Preemie girl maybe? I guess we'll see. Overall, I think it turned out great. Just not the size I intended. Of course, I can easily go in and make it smaller. But I seriously don't want to do this.

I used coral, blue and peach tulle with a red wine colored ribbon on the waist.

Saturday, January 1, 2011

My Bink Friend


Here was today's project. I'm calling this little guy My Bink Friend (like my Best friend).

He was fun to create. Okay, not really. But I'm sure the next one will be. First time I've tried attaching a bottom to a stuffed doll. That took some work.

He's roughly 6" tall. The ribbon extends about 15 inches and works on any style pacifier. And he's got a little pocket on his belly.